PlugStream Operating Manual
This operating manual applies to the PlugStream 7S (PS-7S) and PlugStream 7T (PS-7T) AC electric vehicle charge points.
Download the PlugStream Operating Manual (PDF)
| Field | Detail |
|---|---|
| Document type | Operating manual |
| Document number | PSL-MAN-PS7-001 |
| Revision | Issue 1 |
| Issue date | 17 August 2026 |
| Applies to | PlugStream 7S (PS-7S) and PlugStream 7T (PS-7T) EV charge points |
| Manufacturer | PlugStream Ltd |
| Company number | 17363930 |
| Manufacturer address | Unit 6 & 7, Chestnut House, Engine Lane, Moorgreen Industrial Park, Eastwood, Nottingham, NG16 3QU |
| Support | support@plugstream.co.uk / 0300 180 0403 |
| Website | https://support.plugstream.co.uk |
Index
- Safety information notice
- Product overview
- Model identification
- External layout and controls
- Intended use
- Before using the charge point
- Charging cable and connector safety
- Installation and commissioning
- Using the charge point
- Charging modes
- PlugStream Sense
- Controls, status indicators and warnings
- MyPlugStream app and PlugStream Cloud
- Connectivity
- Safety features
- Technical specification summary
- Maintenance and inspection
- Troubleshooting
- Disposal and recycling
- Warranty and support
- Related support articles
Safety information notice
Read this safety information before installing, operating, cleaning, inspecting, or troubleshooting a PlugStream charge point.
PlugStream charge points are electrical products connected to mains electricity. Incorrect installation, unsafe use, physical damage, unsuitable accessories, or unauthorised repair can create a risk of electric shock, fire, equipment damage, or injury.
Installation safety
- Installation must only be carried out by a competent and authorised installer.
- The final installation must comply with the applicable version of BS 7671, the IET Code of Practice for Electric Vehicle Charging Equipment Installation, and any other local requirements that apply to the site.
- The charge point must be protected by suitable upstream protection, including a Type A RCD where required by the installation design.
- Do not open the charge point enclosure unless you are authorised and competent to do so.
- Do not install, service, or open the charge point in wet conditions.
Use safety
- Do not use the charge point if the enclosure, cable, connector, socket, or permanent laser-etched marking appears damaged.
- Do not use the charge point if the app, status indicator, vehicle, or installer reports a fault.
- Do not cover, deface, or obscure the permanent safety and rating markings.
- Do not modify the charge point, cable, plug, socket, or internal components.
- Do not use an extension lead.
- Do not use an adapter unless PlugStream has explicitly approved it for the installation and vehicle.
- Keep the cable away from heat, sharp edges, standing water, and moving vehicles.
- Fully uncoil the charging cable before use.
- Keep children away from the charge point and charging cable.
Active implantable medical devices
If you use an active implantable medical device, such as a pacemaker or implantable cardioverter defibrillator, follow the medical-device manufacturer's instructions for electric vehicle charging equipment. Ask your clinician or the device manufacturer for advice before using the charge point if those instructions are unclear.
- Follow any separation distance specified for your medical device.
- Do not place the charging cable or connector directly over the implant site.
- If you suspect interference, stop using the charge point, move away from the equipment, and seek medical advice.
The permanent laser-etched safety marking on the front of the enclosure must remain visible and legible. It is not on the removable face cover. Contact PlugStream Support if the marking is damaged or illegible.
Stop using the charger if damage or a fault is suspected
If you notice damage, burning smells, unusual heat, exposed conductors, water ingress, red LED fault indication, repeated tripping, or unexpected behaviour, stop using the charge point and contact your installer or PlugStream Support.
Product overview
PlugStream 7S and PlugStream 7T are electric vehicle charge points designed for residential, landlord, workplace, and managed parking environments, depending on the installation configuration.
The charge point is designed to:
- deliver AC charging to compatible electric vehicles
- connect to PlugStream services for monitoring and management
- support app-based charging modes and charge point status information
- provide safety monitoring and fault indication
- support software updates where available
PlugStream charge points are wall-mounted AC electric vehicle supply equipment. The installed charge point connects the site's electrical supply to a compatible electric vehicle through a Type 2 socket or tethered Type 2 connector, depending on model and configuration.
At a high level, operation follows this sequence:
- The charge point is installed, commissioned, and connected to the customer's PlugStream account.
- The user connects a compatible electric vehicle.
- The charge point checks its safety state, connection state, selected charging mode, schedule, and any site limits.
- If charging is permitted, the charge point delivers AC energy to the vehicle.
- If charging is not permitted yet, the app and status indicator show the relevant waiting, paused, locked, offline, schedule, or fault state.
- The user, vehicle, selected charging mode, site limit, or safety system can stop charging.
The main externally visible parts are:
| Part | Description |
|---|---|
| Enclosure | Wall-mounted charge point body containing the charging electronics and safety systems. |
| Type 2 socket or tethered connector | Physical EV charging connection, depending on product variant. |
| Status indicator | Light indicator used to show charger state, warnings, and faults. |
| Permanent laser-etched marking | Model, serial, rating, regulatory, identification, and safety information etched on the front of the enclosure. |
| MyPlugStream app and PlugStream Cloud | User and operator software used for status, modes, schedules, readiness, and support workflows. |
Model identification
The model name, serial number, electrical rating, regulatory details, and active-implant warning are permanently laser etched on the front of the enclosure. The marking is not on the removable face cover.
Approved permanent marking artwork: PlugStream 7S (PS-7S) PDF and PlugStream 7T (PS-7T) PDF. The production serial number, manufacture date, and QR content are populated for the individual device.
| Model | Product identifier | GTIN | Connection | Rated output |
|---|---|---|---|---|
| PlugStream 7S | PS-7S |
5065026831491 |
One Type 2 socket | 7.4 kW AC, 230 V single phase, 32 A maximum |
| PlugStream 7T | PS-7T |
5065026831507 |
One integrated 7 m Type 2 cable | 7.4 kW AC, 230 V single phase, 32 A maximum |
The model identifier used for registration, installation records, grant paperwork, warranty, and support must match the laser-etched product marking. Do not record only the PlugStream 7 family name when the exact PS-7S or PS-7T identifier is required.
Always follow the permanent rating marking and installer handover documentation for the specific product installed at your site.
External layout and controls
The approved external arrangement drawings below show the enclosure, connection features, overall dimensions, and controlled drawing title blocks for each model.
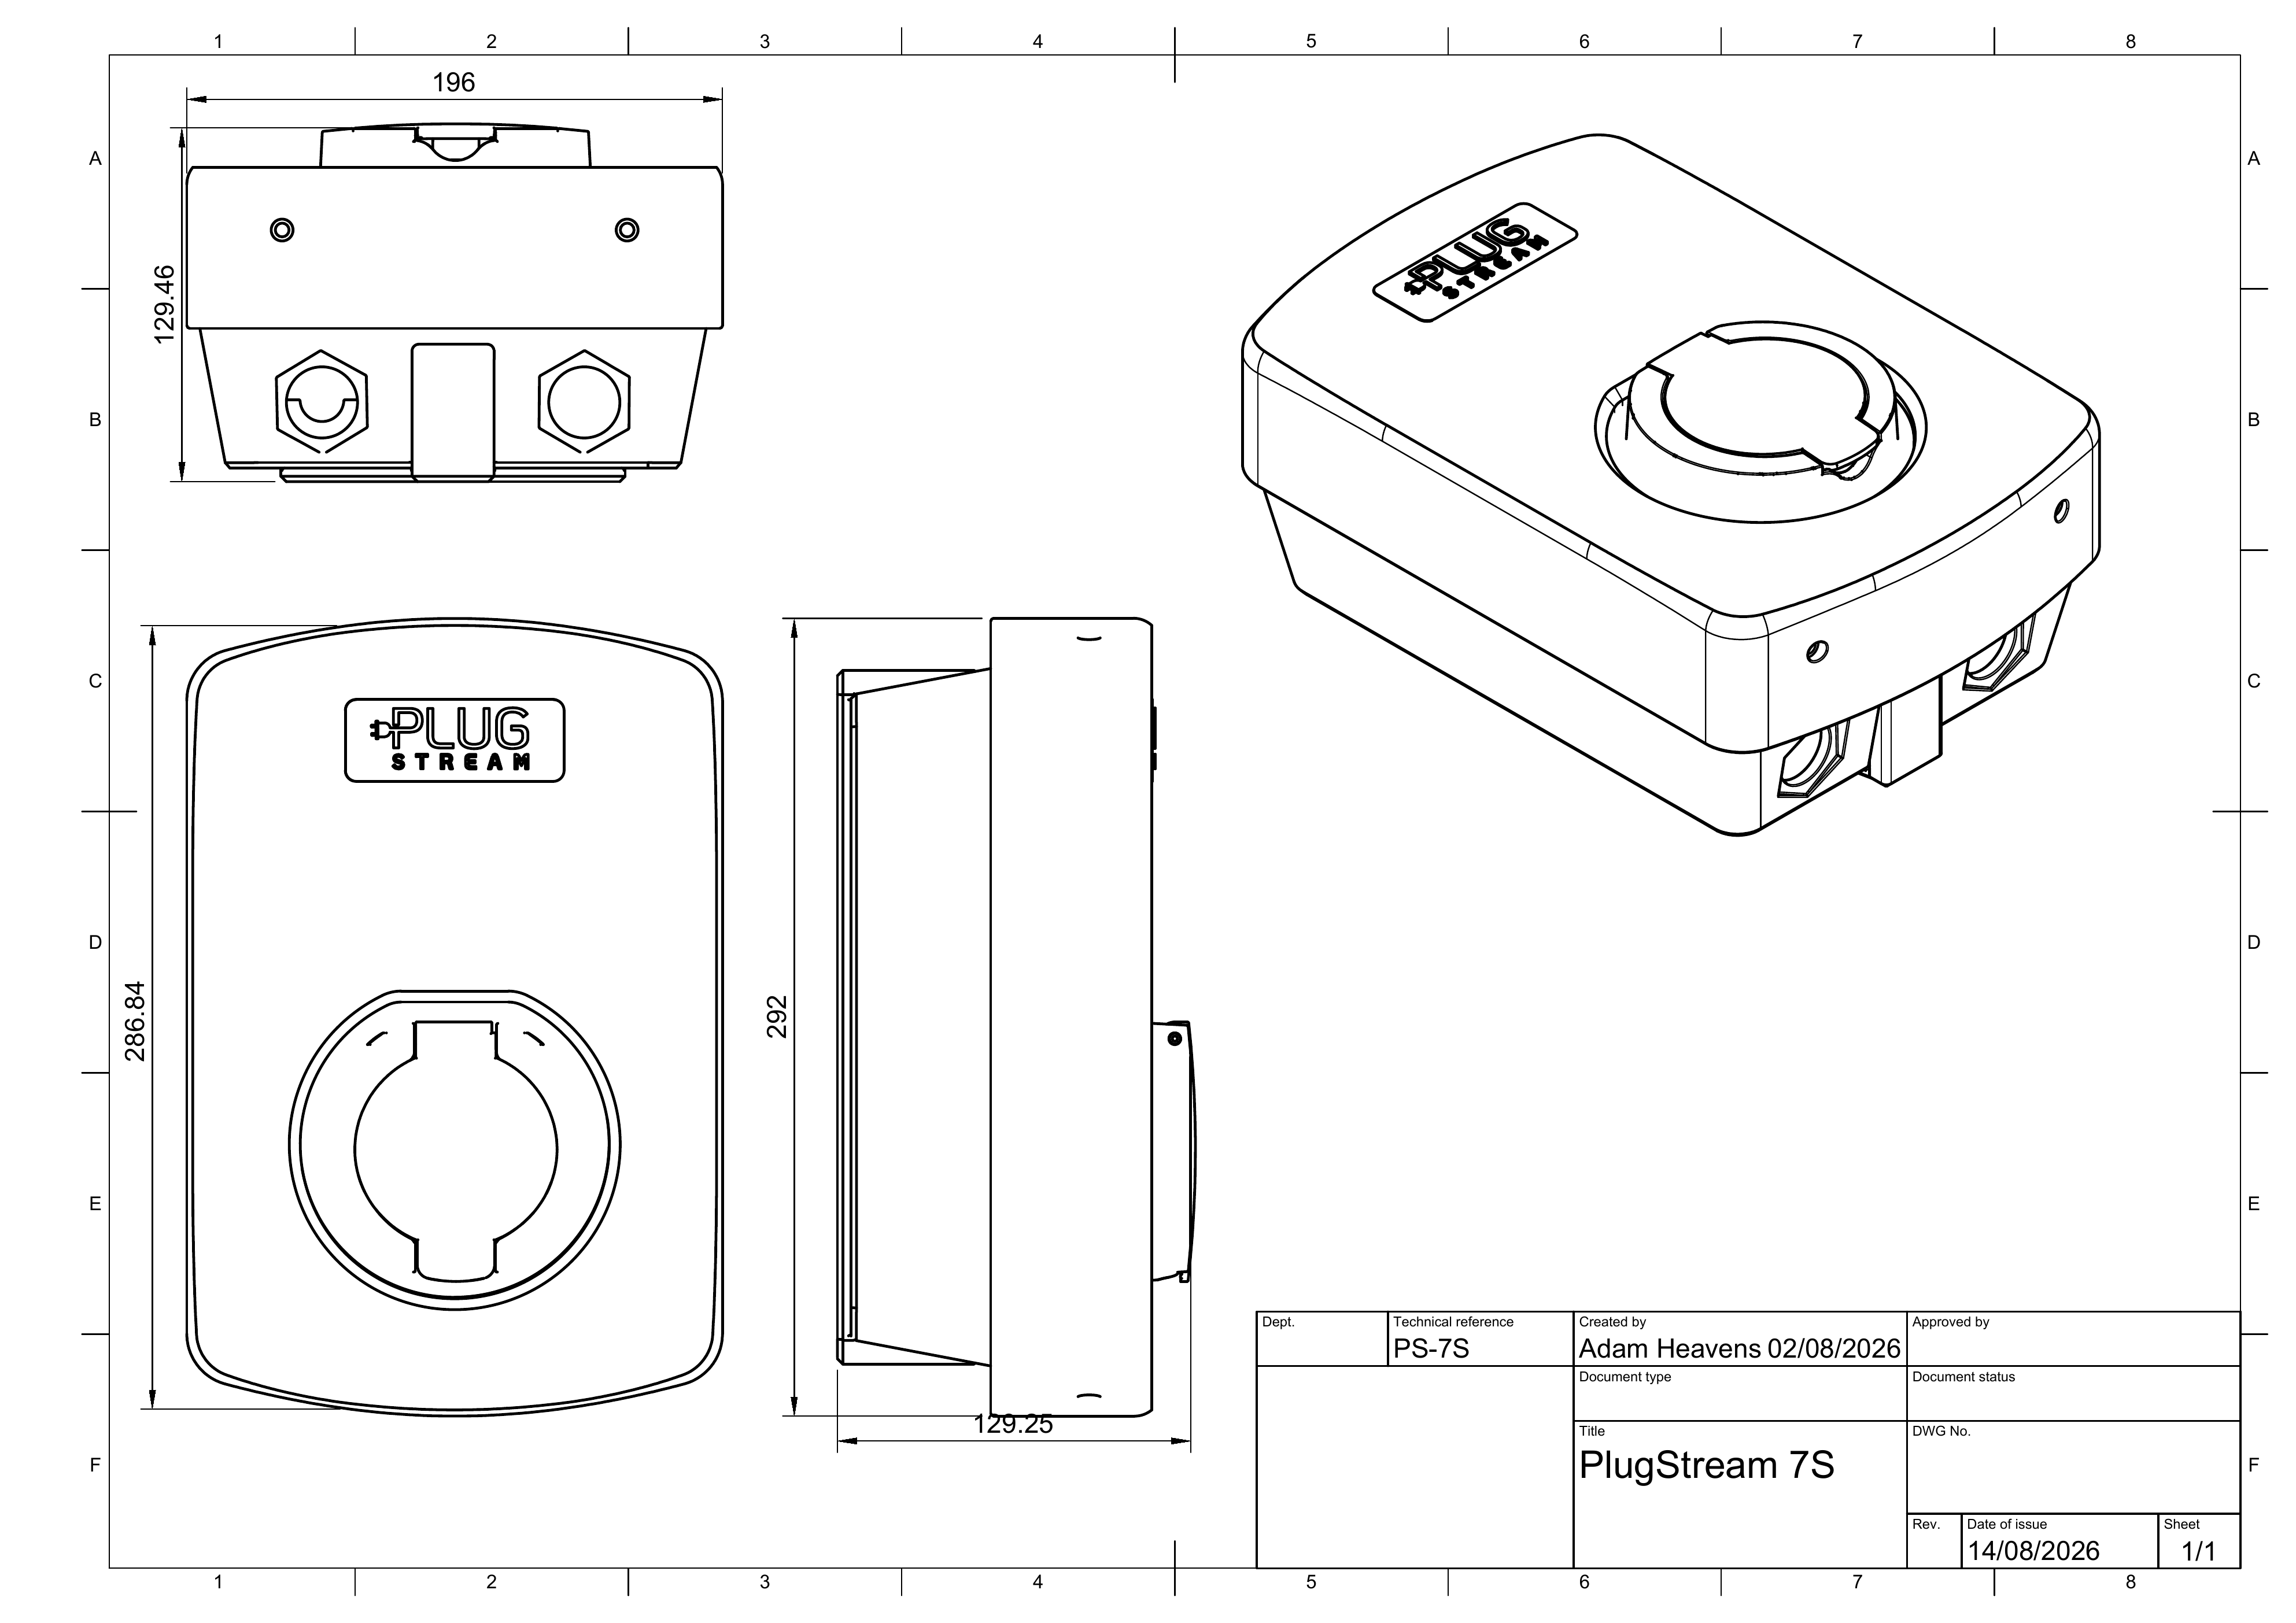
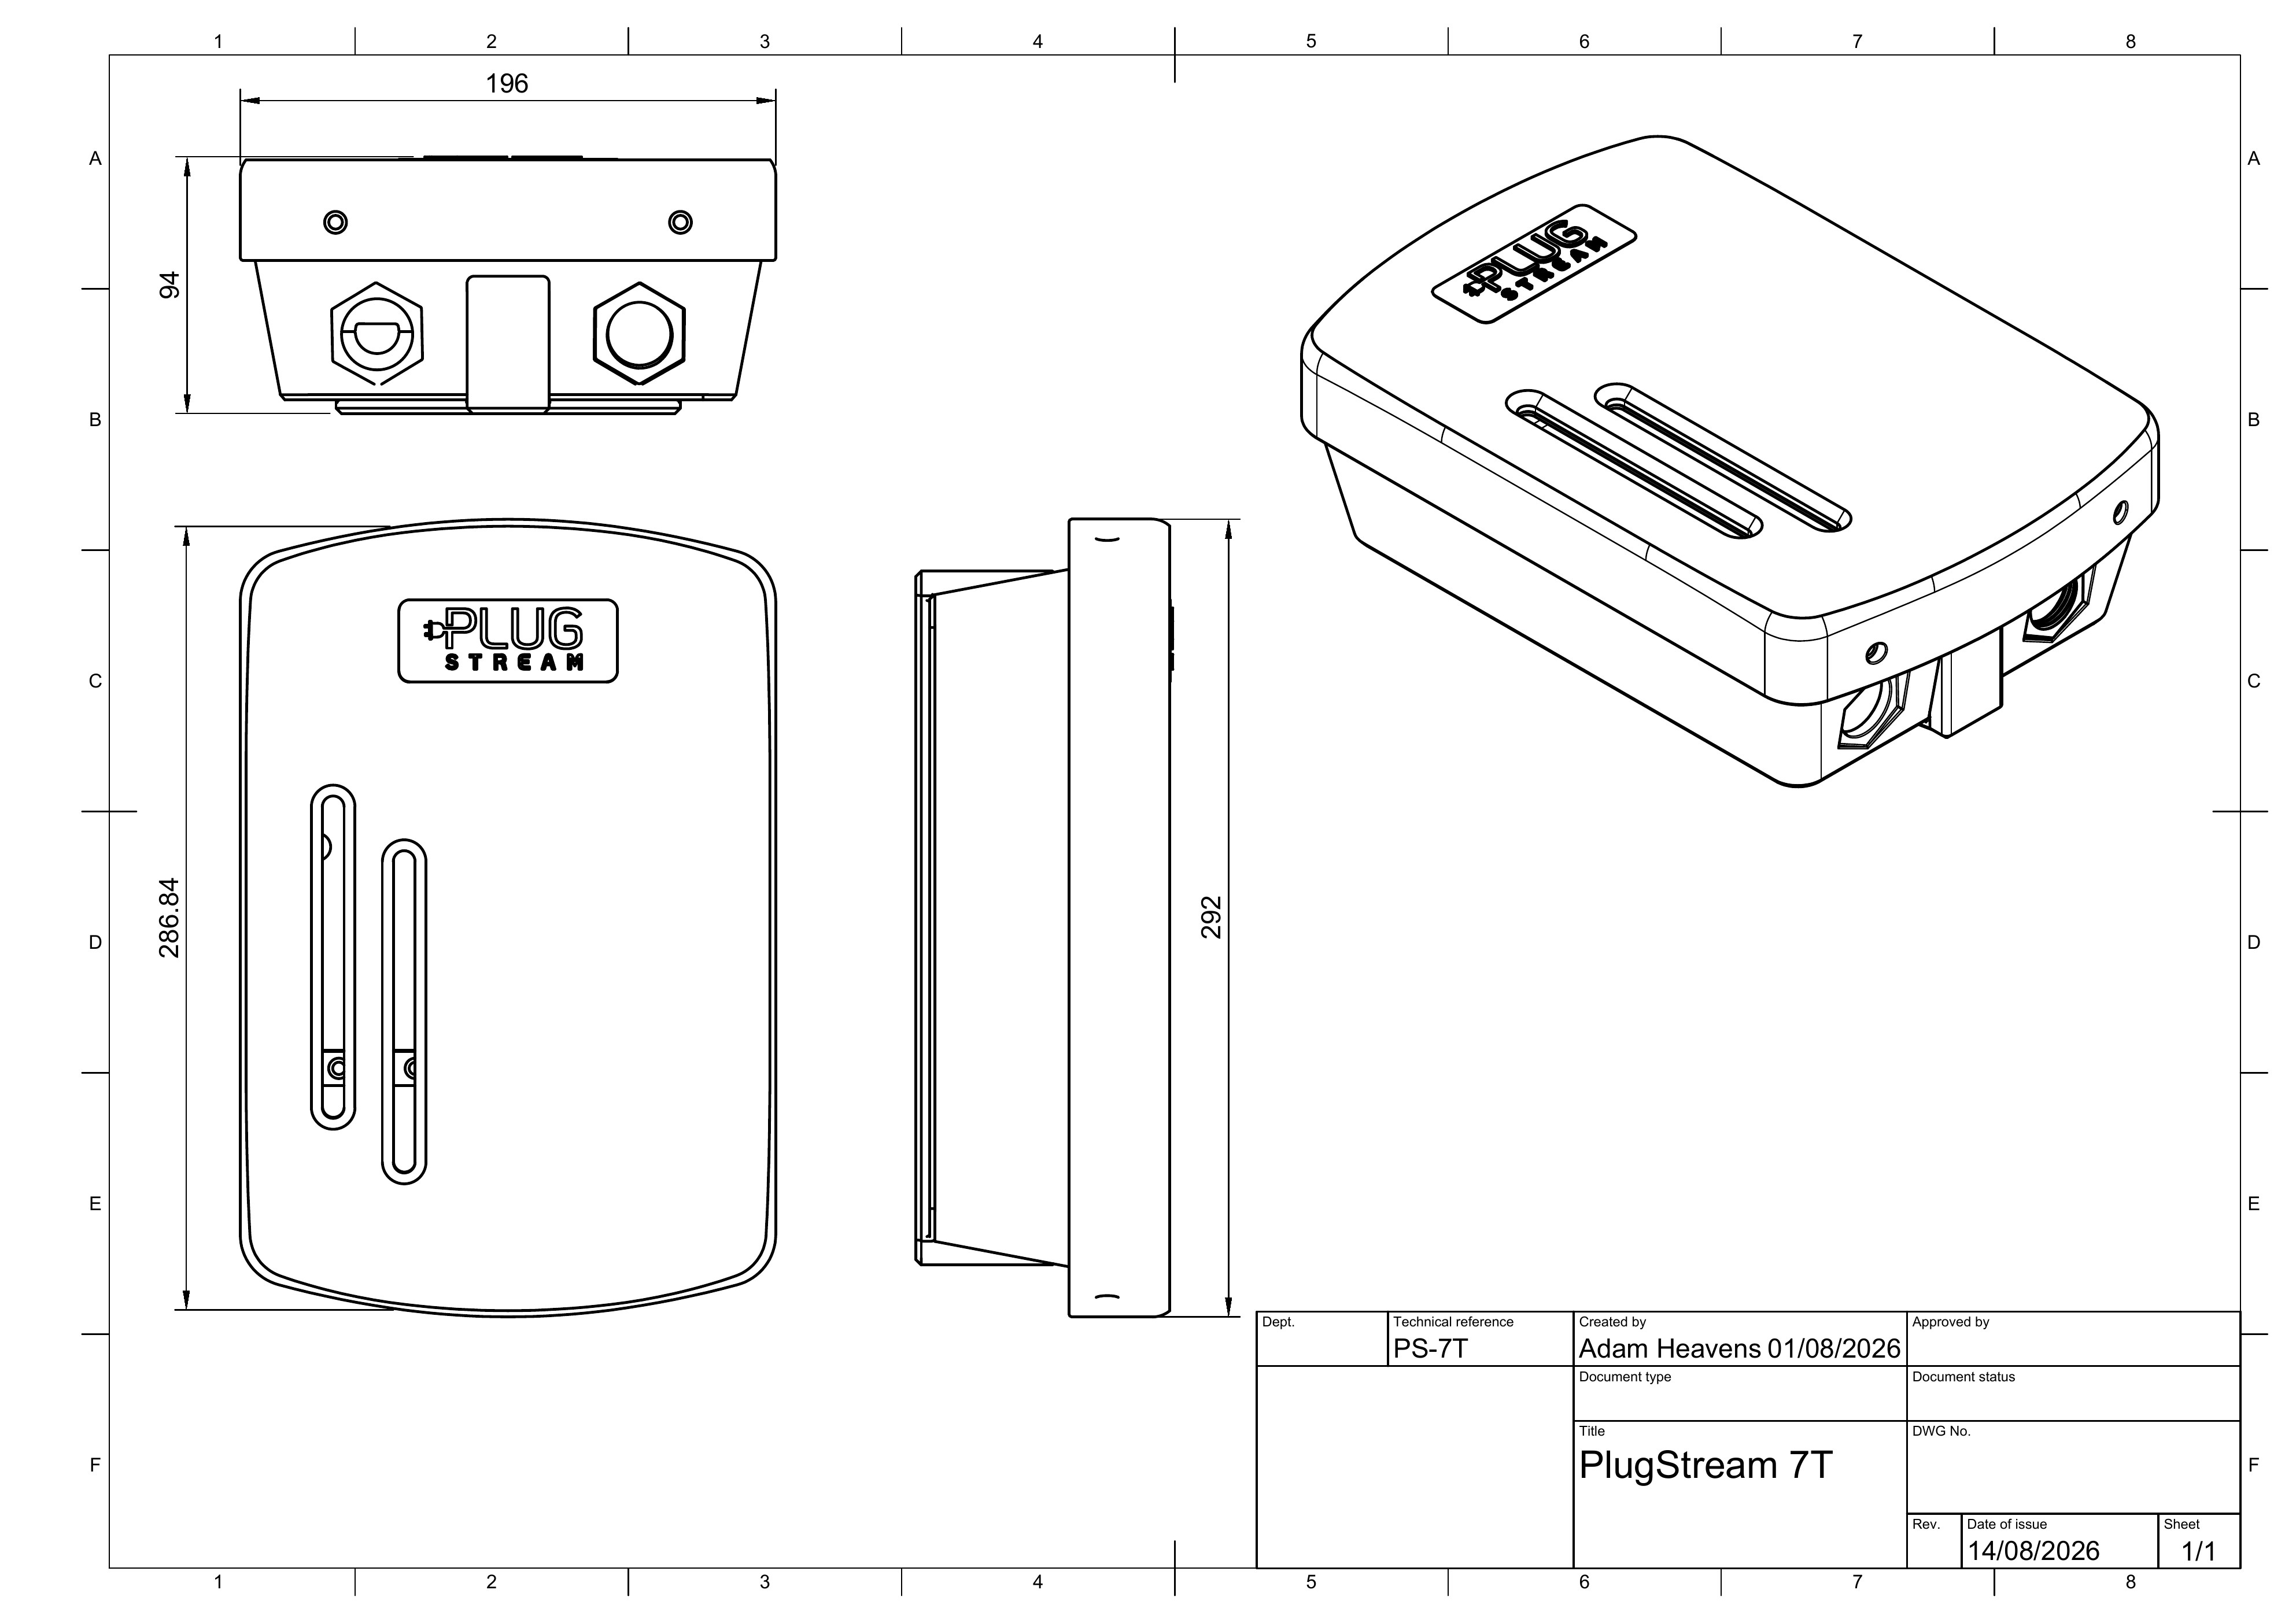
The common PlugStream 7 wall-mount bracket drawing provides the controlled bracket dimensions. The supplied wall-mount bracket acts as the drilling guide and is installed using the supplied fixings. Follow the permanent laser-etched marking and the installation instructions for the installed model.
| External part | Description and operation |
|---|---|
| Enclosure and removable front cover | Protect the internal charging and safety equipment. Only an authorised and competent installer may remove the cover after safely isolating the supply. |
| Status indicator | Shows startup, network, ready, connected, charging, waiting, locked, update, and fault states. The complete status table is in Controls, status indicators and warnings. |
| Type 2 socket - PS-7S | Accepts a compatible Mode 3 Type 2 charging cable. Insert and remove the connector using the plug body after the vehicle and charger have released any lock. |
| Integrated Type 2 cable - PS-7T | The 7 m tethered cable connects directly to a compatible vehicle. Store the cable and connector so they cannot be driven over, immersed, trapped, or create a trip hazard. |
| Permanent laser-etched marking | Identifies the exact model, serial number, electrical rating, regulatory marks, and active-implant precaution. It is etched on the front of the enclosure, not on the removable face cover. Do not cover, deface, or obscure it. |
| Mains and communications entries | Installer-only entries for the electrical supply, Ethernet, and approved accessories. Their final route depends on the installation design and must preserve the enclosure protection. |
The charge point has no customer-operated physical buttons and no screen. Normal customer control is through the vehicle connection and MyPlugStream app. Installer-only controls and terminals inside the enclosure are not user-serviceable.
At a workplace, landlord, fleet, or other shared site, the site operator controls who may use the charge point and whether a payment or reimbursement arrangement applies. Follow the operator's app, access, tariff, and signage instructions before charging. The charge point's own energy reading is operational information and is not a certified billing meter; a separate compliant metering arrangement is required where the law or contract requires one.
Intended use
The charge point is intended to charge compatible electric vehicles using an appropriate charging cable or tethered connector.
Use the charge point only:
- with compatible electric vehicles
- within the operating limits shown on the permanent rating marking and supporting documentation
- after installation and commissioning by a competent installer
- with the protective devices specified by the installation design
- in accordance with the MyPlugStream app, PlugStream Cloud, vehicle, and site instructions
Do not use the charge point:
- as a general-purpose power outlet
- with damaged cables or connectors
- with extension leads
- after unauthorised modification
- if the charge point has reported a safety fault
Installation must be completed by a competent and authorised installer. For installation guidance, see How to Install a PlugStream Charge Point.
Before using the charge point
Before starting a charging session:
- Check the charge point for visible damage.
- Check the charging cable and connector for cracks, contamination, water, corrosion, or damaged pins.
- Confirm that the vehicle inlet is clean, compatible, and undamaged.
- Confirm that the cable is not trapped, strained, twisted, or routed where it may be driven over.
- Check the status indicator or the MyPlugStream app to confirm that the charge point is ready.
If anything looks unsafe, do not charge. Contact your installer or PlugStream Support.
Charging cable and connector safety
- Always handle the connector by the plug body, not by pulling the cable.
- Do not drive over the cable.
- Do not step on the connector.
- Do not leave the connector in standing water.
- Do not force the connector into the vehicle.
- Do not force the connector out of the vehicle if it is locked.
- Store the cable safely when not in use.
If the connector cannot be removed, check whether the vehicle has locked the cable. See I can't unplug my charge point.
Installation and commissioning
Installation and commissioning must be completed by a competent and authorised installer. The installer must follow the permanent product marking, the installation design, the current edition of BS 7671, the IET Code of Practice for Electric Vehicle Charging Equipment Installation, BS EN 61851, the Electricity Safety, Quality and Continuity Regulations, applicable Building Regulations, and any other requirements that apply to the site.
Before installation
- Confirm the exact model on the laser-etched marking: PlugStream 7S (
PS-7S) or PlugStream 7T (PS-7T). - Survey the supply, earthing arrangement, main protective device, proposed charger circuit, installation position, cable route, network route, accessibility, and any site load-management requirement.
- Confirm the selected position allows the charger, vehicle, cable, and surrounding space to be used safely, including by drivers with mobility or access needs.
- Select suitable upstream overcurrent and Type A residual-current protection for the installation design. The charger incorporates 6 mA DC residual-current protection but still requires the upstream AC protection specified by the design.
- Confirm that the wall, pedestal, or approved mounting system can support the charger and that the supplied wall-mount bracket and fixings are available.
Physical installation
- Isolate the supply, lock off where required, and prove dead before opening or working on the charger.
- Remove the front cover using the top and bottom fixings.
- Position the supplied wall-mount bracket and use its mounting holes as the drilling guide. The approved external arrangement drawings in this manual are dimensional references, not drilling templates.
- Install the bracket using the supplied fixings, confirm it is level and at the designed height, then mount and secure the charger. The normal minimum mounting height is 0.9 m from ground level unless the approved design requires another position.
- Bring the supply cable through an approved entry without compromising the IP rating. Connect live, neutral, and protective earth to their marked terminals.
- Tighten terminals to the value marked on the product or PCB. Where the terminal is marked
1.2 Nm, use 1.2 Nm. Do not route the protective earth conductor through the RCD module. - Install Ethernet and any approved Aux CT or communications accessories required by the site design. Fit an Aux CT around the single live conductor in the specified direction and maintain its
S1/S2polarity. Never leave a current-output CT secondary open-circuit while clamped around an energised conductor. - Inspect the wiring, earth route, terminals, entry seals, fixings, and enclosure. Refit and secure the front cover.
- Complete the required dead and live electrical tests, including polarity, protective-conductor continuity, earth fault loop or impedance checks, RCD tests, and PEN fault verification where applicable.
Detailed photographs and terminal information are in How to Install a PlugStream Charge Point.
Network setup and commissioning
- Prepare Ethernet, 2.4 GHz Wi-Fi, or an approved optional 4G connection. Ethernet is recommended where practical.
- Power the charger only after the electrical checks are complete. The startup self-test shows a rainbow status pattern.
- Begin PlugStream Installer app commissioning within the first 10 minutes after power-on while Bluetooth is available.
- Select the charger using its serial number, assign the correct customer and site, and configure Wi-Fi if required. On firmware version 1.44.0 or later, the app authenticates state-changing Bluetooth commands automatically. An active Bluetooth connection is not deliberately stopped by the charger.
- Confirm that the exact
PS-7SorPS-7Tmodel, charger serial, network connection, PlugStream Cloud/OCPP connection, site limit, and firmware status are correct. - Upload the installation evidence, including the installed charger, legible laser-etched product marking, internal wiring before closure, protective device, installed context, and Aux CT where fitted.
- Run the installer self-test and confirm the relay, residual-current protection, output-live state, and the PS-7S socket lock where applicable.
- Review live voltage, current, power, and Aux CT direction where fitted. Complete an authorised charging test with a vehicle or approved tester.
- Record the electrical sign-off, installation certificate details, protective device rating, supply limit, and any site-specific notes.
- Generate the customer handover QR code or link and give the customer the operating manual, electrical certificate, warranty information, exact model and serial, and support contact details.
If the Bluetooth setup window closes before commissioning begins, safely restart the charger to open a new 10-minute window or ask PlugStream Support to open a temporary service window. If the charger remains offline, Bluetooth returns automatically after about 5 minutes. Do not interrupt a solid-purple critical firmware update.
For the full app workflow, see How to Use the PlugStream Installer App.
Using the charge point
Start charging
- Park the vehicle safely.
- Switch off the vehicle.
- Connect the charging cable to the vehicle.
- Confirm the charge point status in the MyPlugStream app or by checking the LED indicator.
- Charging will begin according to the selected charging mode.
Depending on the selected mode, charging may start immediately or wait for a schedule, random delay, readiness condition, tariff window, site limit, or manual start command.
Stop charging
Charging may stop when:
- the vehicle reaches its target state of charge
- the vehicle stops requesting energy
- the selected schedule ends
- the user stops charging from the app or vehicle
- the site limit or load balancing system reduces charging to zero
- the charge point detects a fault or unsafe condition
Before disconnecting the cable, follow the vehicle manufacturer's instructions to unlock the connector.
Charging modes
Charging modes control when the charge point is allowed to deliver energy.
| Mode | What it does |
|---|---|
| UK Smart Charging Regulations | Uses compliant default charging behaviour, including randomised delay where required. |
| Plug & Charge | Starts charging automatically when the vehicle is connected and the charger is ready. |
| Scheduled Charging | Allows charging during fixed time windows selected by the user or operator. |
| PlugStream Sense | Plans charging around lower-cost periods where tariff data is available, while protecting the ready-by time. |
| Manual | Requires charging to be started and stopped manually. |
For a customer-facing explanation, see Charging Modes.
PlugStream Sense
PlugStream Sense is PlugStream's intelligent charging mode. It can use tariff data, required energy, and a ready-by time to estimate a charging plan.
When PlugStream controls the charging plan, the app may show:
- estimated energy needed
- estimated charging cost
- charge-now comparison
- estimated saving where reliable
- selected charging windows
- readiness confidence
When an energy supplier controls the charging schedule, the app may show PlugStream Sense Monitoring. In this case, PlugStream monitors readiness and charger state but does not override the supplier-managed schedule.
Cost and saving figures are estimates and may not match the customer's supplier bill.
Controls, status indicators and warnings
The charge point has no customer-serviceable internal controls. Users operate the charge point through the vehicle connection, MyPlugStream app, PlugStream Cloud, and any physical connector/socket lock behaviour provided by the vehicle or installation.
The charge point uses the status indicator to show operating state.
Common examples include:
| Indicator | Meaning |
|---|---|
| Rainbow pattern | Startup self-test. |
| White solid | Charge point connected to the network but not accepted by the management system yet. |
| White pulsing | No internet connection. |
| Purple solid | Critical firmware update in progress. Bluetooth may be unavailable while the update completes. |
| Blue solid | Ready to use, no vehicle plugged in. |
| Green solid | Vehicle plugged in. |
| Green pulsing | Vehicle charging. |
| Green circle | Waiting on random delay. |
| Blue pulsing | Vehicle plugged in and waiting for the selected schedule. |
| Orange solid | Charge point is locked. |
| Orange pulsing | A locked charge point is trying to be used. |
| Red solid | The charge point safety system has activated. Charging is stopped. |
For the latest customer-facing LED guide, see LED Statuses.
Errors and warnings
| Warning or error | Typical user action |
|---|---|
| Offline or no internet connection | Check local router, Wi-Fi, Ethernet, and site internet service. Charging may continue in a limited mode depending on configuration. |
| Waiting for schedule or random delay | Check the selected charging mode and schedule in the app. Charging may start later. |
| Charging paused or limited | Check vehicle demand, site load balancing, tariff mode, and Charger readiness. |
| Locked charger | Unlock the charge point in the app or contact the site operator if it is managed by another account. |
| Red safety fault | Stop using the charge point and contact the installer or PlugStream Support. |
| PEN fault warning | Stop charging and report the supply issue to the local Distribution Network Operator by dialling 105 in the UK. |
| Critical firmware update | Leave the charge point powered and allow the update to complete unless advised otherwise by support. |
| Bluetooth charger not found | Scan during the first 10 minutes after power-on, or after the charger has been offline for about 5 minutes. Check phone permissions and stay close to the charger. Do not interrupt a critical firmware update. |
MyPlugStream app and PlugStream Cloud
The MyPlugStream app and PlugStream Cloud can be used to:
- view charger status
- check Charger readiness
- change charging mode where permitted
- configure schedules
- view charging sessions and consumption information for the preceding 12 months
- create summary or detailed reports covering up to 365 days
- manage tariff-aware settings where available
- receive status and readiness information
To set up the app:
- Install MyPlugStream from the official Apple App Store or Google Play listing.
- Sign in or create the customer account using the email address recorded during installation.
- Open the time-limited handover link or scan the handover QR code supplied by the installer. If the charger is already assigned, ask the current owner, installer, or PlugStream Support to complete the approved access or ownership process.
- Confirm the exact charger model and serial number shown in the app match the laser-etched product marking.
- Select a charging mode, review the schedule and ready-by settings, and check Charger readiness before the first charging session.
The app is used for day-to-day status and control. PlugStream Cloud provides the connected back-end service for monitoring, charging configuration, firmware delivery, support diagnostics, and authorised operator workflows. Loss of the cloud connection may limit those smart features, but the charger retains its local safety functions and may continue basic charging according to its stored configuration.
To review historic consumption, open Reports, select the charger, choose a reporting period of up to 365 days, and select Summary or Detailed sessions. A detailed report lists the charging sessions within the selected period. Generated reports remain in the report library for 13 months. See View Charging History and Create a 12-Month Report.
Charger readiness explains whether the charger is ready, waiting, charging, paused, offline, disabled, or faulted. See What is Charger readiness in the MyPlugStream app?.
Connectivity
PlugStream charge points support network connection options depending on model and installed hardware:
- Ethernet
- Wi-Fi
- Bluetooth app setup
- local hotspot and setup portal
- optional 4G add-on card where installed
For the most stable connection to PlugStream Cloud, Ethernet is recommended where practical.
Wi-Fi can be configured in two supported ways:
- Bluetooth setup through the app, where the phone connects to the charge point over Bluetooth and sends the selected Wi-Fi details.
- Local hotspot and setup portal, where the charge point temporarily broadcasts a local setup network and Wi-Fi is configured from a phone or laptop browser.
The app, installer, or PlugStream Support will tell you which method to use for your charger and installation state.
Bluetooth availability
On PlugStream 7S and PlugStream 7T firmware version 1.42.0 or later, Bluetooth is demand-based:
- it is available for the first 10 minutes after every power-on
- it becomes available after the charger has been offline for about 5 minutes
- it is not deliberately stopped while a Bluetooth client is connected
- it remains available for up to 30 minutes after the most recent Bluetooth connection or disconnection
- it switches off during normal online operation when none of those conditions applies
- PlugStream Support can temporarily force it on for the current boot; the forced setting does not survive a restart
The policy is checked every 30 seconds, so transitions may occur slightly after the stated threshold. Bluetooth switching off does not affect charging or the charger's Wi-Fi, Ethernet, 4G, or PlugStream Cloud connection.
On firmware version 1.44.0 or later, Bluetooth authentication is enabled by default in every published build. The app must authenticate before it sends state-changing Bluetooth commands and obtains a short-lived, device-specific authorisation from PlugStream services. A per-device service control allows an authorised technician with local provisioning access to disable enforcement temporarily for controlled rollout recovery. This is not an owner setting or a shipping default; service use should be authorised, recorded, time-limited, and returned to the enabled state after recovery. Discovery and read-only status remain available for identification and recovery guidance.
See Bluetooth Availability and Setup Windows for recovery steps and firmware caveats.
If the charge point loses internet connectivity, basic charging behaviour may continue depending on configuration, but app control, monitoring, software updates, tariff features, and remote support may be limited.
See Setup WiFi/Ethernet Network Connection.
Safety features
PlugStream charge points include safety features and monitoring, including:
- 6mA DC fault protection
- PEN fault detection where supported by the model, market variant, and installation configuration
- fault reporting through LED state and app status
- charger readiness and site-limit information where connected services are available
The final installation must still include the protective devices and checks required by the installation design and applicable regulations.
Technical specification summary
Always use the permanent laser-etched marking and installer handover documentation for the installed charge point when confirming exact ratings.
| Item | PlugStream 7S | PlugStream 7T |
|---|---|---|
| Product identifier | PS-7S |
PS-7T |
| GTIN | 5065026831491 |
5065026831507 |
| Product type | Mode 3 AC electric vehicle charge point | Mode 3 AC electric vehicle charge point |
| Supply and phase | 230 V AC, single phase | 230 V AC, single phase |
| Rated power | 7.4 kW | 7.4 kW |
| Rated current | 32 A maximum | 32 A maximum |
| Mains frequency | 50 Hz | 50 Hz |
| Vehicle connection | One IEC 62196 Type 2 socket | One integrated 7 m Type 2 cable |
| Maximum envelope shown on approved drawing | 292 mm high x 196 mm wide x 129.46 mm deep | 292 mm high x 196 mm wide x 94 mm deep, excluding the stored cable |
| Approximate weight | 2.6 kg | 4.0 kg, including the integrated 7 m cable |
| Standard mounting | Wall mounted; approved pole mounting available separately | Wall mounted; approved pole mounting available separately |
| Enclosure material | PC / ASA-CF20 | PC / ASA-CF20 |
| Ingress protection | IP66 | IP66 |
| Impact protection | IK10 | IK10 |
| Operating temperature | -25 degrees C to +40 degrees C ambient | -25 degrees C to +40 degrees C ambient |
| Operating humidity | Up to 95% relative humidity, non-condensing | Up to 95% relative humidity, non-condensing |
| Pollution degree | 3 | 3 |
| Maximum altitude | 2,000 m | 2,000 m |
| Network connectivity | 2.4 GHz Wi-Fi 802.11 b/g/n, Bluetooth LE 5.0, Ethernet, optional 4G | 2.4 GHz Wi-Fi 802.11 b/g/n, Bluetooth LE 5.0, Ethernet, optional 4G |
| Smart charging protocol | OCPP 2.0.1 | OCPP 2.0.1 |
| DC residual-current protection | Built-in 6 mA DC protection | Built-in 6 mA DC protection |
| Upstream AC residual-current protection | Type A RCD required by the installation design | Type A RCD required by the installation design |
| Overcurrent protection | External MCB or RCBO required by the installation design | External MCB or RCBO required by the installation design |
| Compatible earthing arrangements | TN-C-S and TN-S with integrated PEN fault protection, or TT, subject to the installation design | TN-C-S and TN-S with integrated PEN fault protection, or TT, subject to the installation design |
| Software updates | Cryptographically signed updates supported on firmware version 1.45.0 or later while connected to PlugStream services | Cryptographically signed updates supported on firmware version 1.45.0 or later while connected to PlugStream services |
Maintenance and inspection
The user should regularly inspect:
- the enclosure
- the charging cable
- the connector or socket
- the visible laser-etched product and safety marking
- mounting condition
- signs of water ingress, overheating, cracking, or impact damage
Clean the outside of the charge point only with a soft, dry or slightly damp cloth. Do not use abrasive cleaners, pressure washers, solvents, or excessive water.
Do not open the charge point for cleaning or inspection unless you are authorised and competent to do so.
Troubleshooting
| Issue | What to check |
|---|---|
| Charging does not start | Check Charger readiness in the app. The charger may be waiting for a schedule, random delay, vehicle signal, site limit, or manual start. |
| Charger appears offline | Check local Wi-Fi, Ethernet, router, and site internet service. |
| App cannot find the charger over Bluetooth | Scan within 10 minutes of power-on or after the charger has been offline for about 5 minutes. Check phone permissions and see the Bluetooth availability guide. |
| Cable cannot be unplugged | Check the vehicle unlock process and any cable-lock status. |
| Red LED or safety fault | Stop using the charge point and contact support or your installer. |
| Charging is slower than expected | Check vehicle limits, site load balancing, tariff mode, schedule, and Charger readiness. |
For app-specific guidance, see:
- What do Charger readiness statuses mean?
- Why does the app say Charging paused?
- What is load balancing and why can it affect charging?
Disposal and recycling
Do not dispose of the charge point, cable, connector, electronic components, or packaging in general household waste where electrical or electronic waste recycling rules apply.
At end of life:
- Stop using the charge point.
- Arrange safe isolation and removal by a competent person.
- Follow local waste electrical and electronic equipment requirements.
- Recycle packaging materials where local services allow.
- Contact PlugStream Support if you need guidance on disposal routes for the product or replacement parts.
Warranty and support
PlugStream 7S (PS-7S) and PlugStream 7T (PS-7T) charge points sold for eligible residential or commercial installations in Great Britain include a three-year on-site warranty on covered parts and installation, starting on the first installation date. PlugStream will first attempt remote diagnosis, then arrange on-site assistance and repair where required. If a covered fault cannot be repaired on site, PlugStream will arrange repair away from the site or replacement and reinstallation without additional cost to the customer. This commitment is subject to the published warranty exclusions and does not affect statutory rights.
An installer-activated extension may provide additional hardware cover to five years. It does not reduce the three-year on-site parts-and-installation commitment.
For current public warranty guidance, see PlugStream Warranty Policy.
Warranty coverage may be affected by:
- unauthorised modification
- incorrect installation
- unsuitable upstream protection
- physical damage
- water ingress caused by incorrect installation or damage
- use of unapproved adapters or extension leads
- covering, defacing, or obscuring permanent safety or rating markings
For help, contact PlugStream Support:
- Email: support@plugstream.co.uk
- Phone: 0300 180 0403
- Support site: https://support.plugstream.co.uk