How to Use the PlugStream Installer App
Use the PlugStream Installer app after the site is prepared, the charger is mounted and wired, the required photos are available, and the network route is known. Power on the charger only when the installation checks are complete and you are ready to commission.
Physical installation first
This guide starts after the physical installation. For mounting, mains connection, upstream protection, and power-on checks, see How to Install a PlugStream Charge Point.
Screenshots in this guide are examples. Use the actual charger, customer, location, and site values from the installation you are commissioning.
Download the PlugStream Installer app before attending site:
![]()
![]()
Before Opening the App
Have the following ready:
- customer name and email address
- site address and location name
- charger serial number and activation details
- Wi-Fi SSID and password, Ethernet connection, or mobile connectivity plan
- required installation evidence photos, or safe access to take them
- CT and site load-management details, if fitted
- protective device rating and max supply value
- a real vehicle, tester/emulator, or approved manual override reason for the charge test
Read these guides before starting:
Network Options
The app uses Bluetooth for local commissioning, but the charger still needs a working internet route for PlugStream Cloud, live diagnostics, and customer handover.
- Ethernet: connect the Ethernet cable before final checks. The app should show the charger online, network connected, and cloud/OCPP connected before handover.
- Wi-Fi: use the app Bluetooth flow to select the Wi-Fi network and enter the password, or follow the local hotspot setup article if directed by support.
- Mobile: use only where the optional mobile card is fitted and the site has suitable signal.
For the full network guide, see Network setup.
Required Photo Pack
The Installer app records the photo evidence used for the installer warranty workflow.
| Photo | What to show |
|---|---|
| Charger front | A straight-on photo showing the installed charger body. |
| Serial / rating label | The product label with the serial and rating legible. |
| PCB wiring | The wired PCB, supply terminals, earth routing, and cable entry before the cover is closed. |
| Consumer unit / isolator | The protective device or isolator serving the charger. |
| Installed context | A wider shot showing the charger in its finished install location. |
Photos can be uploaded during commissioning or deferred if mobile upload is unavailable on site. The charger can still be handed over when photos are deferred, but the installer warranty remains pending until the evidence is uploaded.
Walkthrough
1. Complete the Site Readiness Checklist
The app starts with a pre-commissioning checklist. Tick each item only when it is true on site:
- site and customer details are prepared
- network route is ready
- charger is mounted and checked
- photos are captured or still accessible
- charger is powered on for commissioning
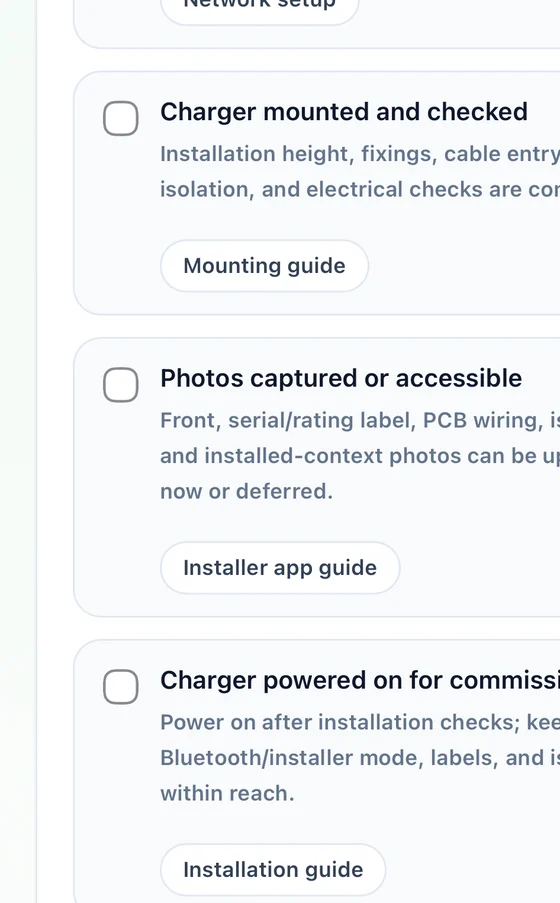
The Start Bluetooth commissioning button remains disabled until the checklist is complete.
2. Scan for the Charger Over Bluetooth
Tap Start Bluetooth commissioning and stay close to the charger. Only PlugStream devices should appear in the scan list.
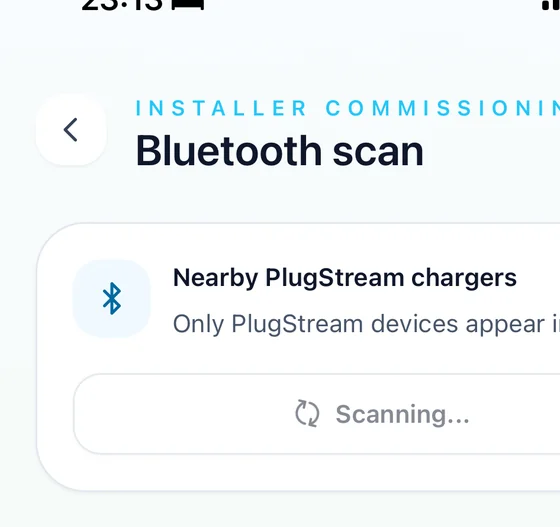
If no charger appears, move closer, confirm the charger is powered on, check Bluetooth permissions, and scan again. Select the correct charger when it appears.
If Wi-Fi setup is required, the app will ask you to select the network and enter the password. Ethernet installations can continue after the charger is activated, but the device/network step must still confirm cloud connectivity before handover.
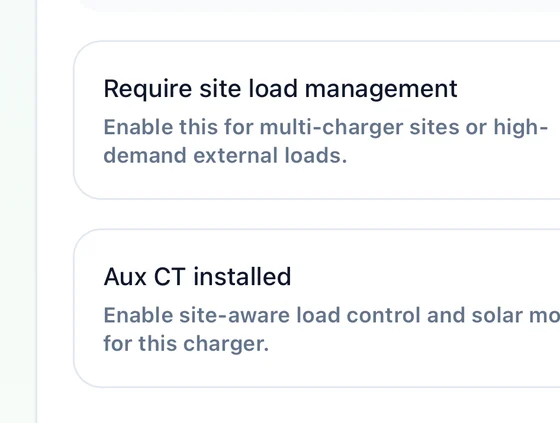
3. Assign the Customer and Confirm Site Settings
Find or create the customer record using the customer's email address, then confirm the correct location.
Review the site settings before continuing:
- enable site load management only where the site design requires it
- enable Aux CT only when installed
- confirm Aux CT polarity if fitted
- leave Use location site limit enabled when the saved location max supply should be copied into the charger settings
4. Check Firmware Readiness
The app compares the installed charger firmware with the approved version for that product.
If an approved update is available, start it before final tests. The app allows you to continue with evidence while the charger downloads, installs, and reboots. Wait for the charger to report healthy before completing final testing and handover.
5. Upload or Defer Installation Evidence
Complete the installation checklist in the app:
- mounting type
- supply phase
- protective device rating
- installer notes, if useful for support or future service visits
- required photo pack
Upload photos where possible. If mobile upload is unavailable, use the defer option and upload the evidence later.
6. Verify Device and Network Status
The first testing step refreshes live charger data and confirms:
- charger online
- Wi-Fi or Ethernet connected and reporting
- cloud / OCPP connected
- site limit and activation confirmed
Resolve any network or cloud warning before customer handover.
7. Run the Installer Self-Test
Run the charger self-test so relay, socket lock, RCD, and output-live checks are recorded in the live commissioning report.
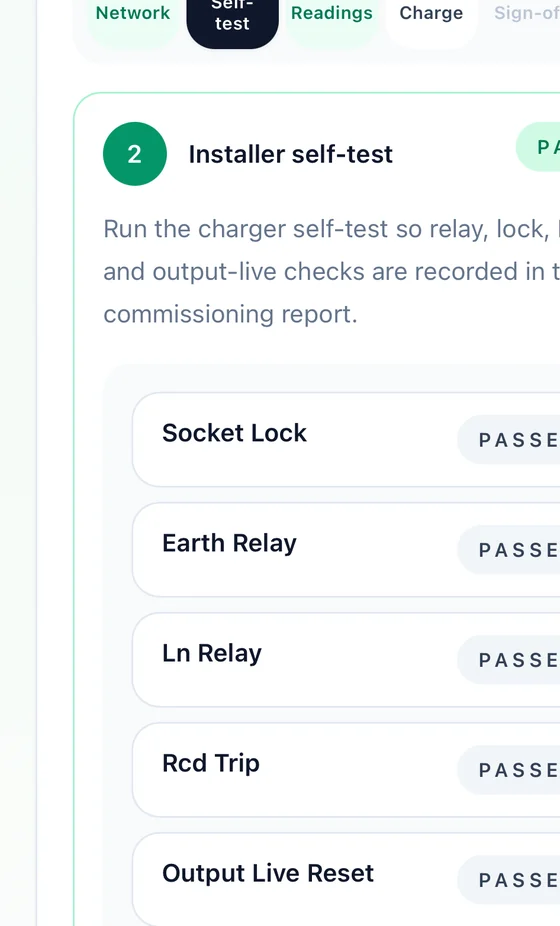
Do not continue until the self-test has passed or the app provides a clear next step.
8. Review Live Charger Readings
Review voltage, current, and power values before handover.
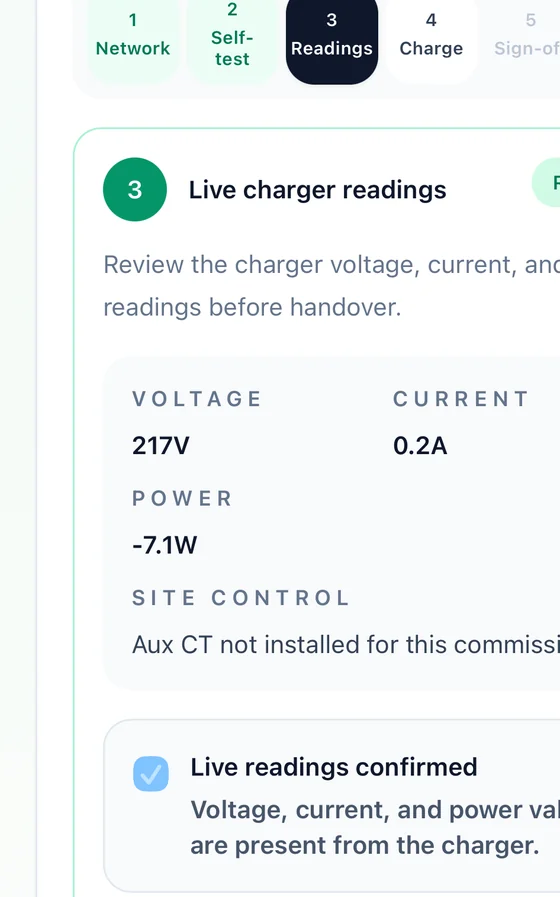
If site load management or Aux CT is enabled, the app also checks CT direction and site control behaviour. If no Aux CT is installed, the app records that site control checks are not required for that commission.
9. Complete the Charge Test
Start an installer-authorised charge session and confirm the result is recorded.

Use the correct test method:
- Vehicle: use when a real EV is connected. The test runs for the required period and checks for current.
- Tester / emulator: use when no real vehicle is present. This passes when State C and output live are confirmed.
- Manual override: use only when neither a vehicle nor tester/emulator test can be completed, and record clear notes explaining why.
The charger uses installer test authorisation during this diagnostic run, so normal schedule and random-delay waits are skipped.
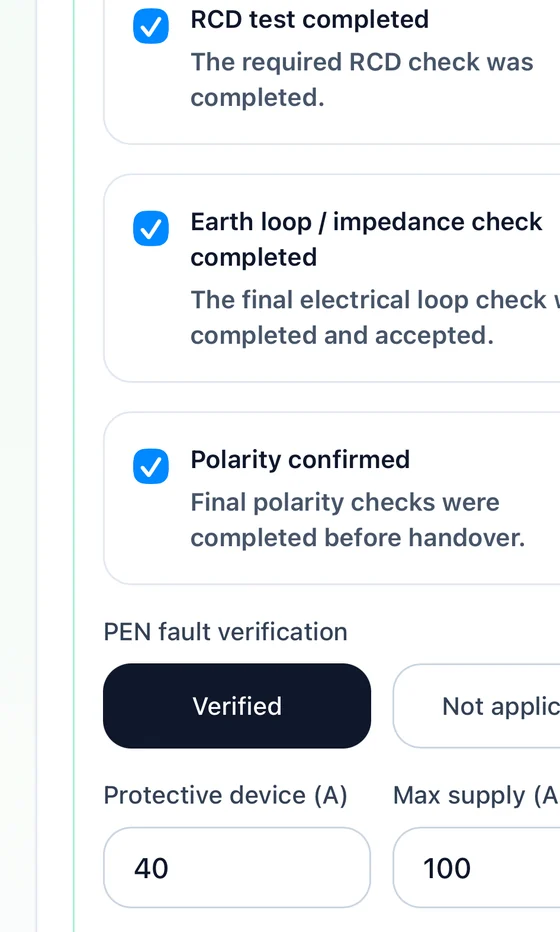
10. Complete Electrical Sign-Off
Record the final electrical sign-off items:
- RCD test completed
- earth loop / impedance check completed
- polarity confirmed
- PEN fault verification or not applicable
- protective device rating
- max supply value
- verification notes for support or future visits
Resolve any blocking warning before moving to review and handover.
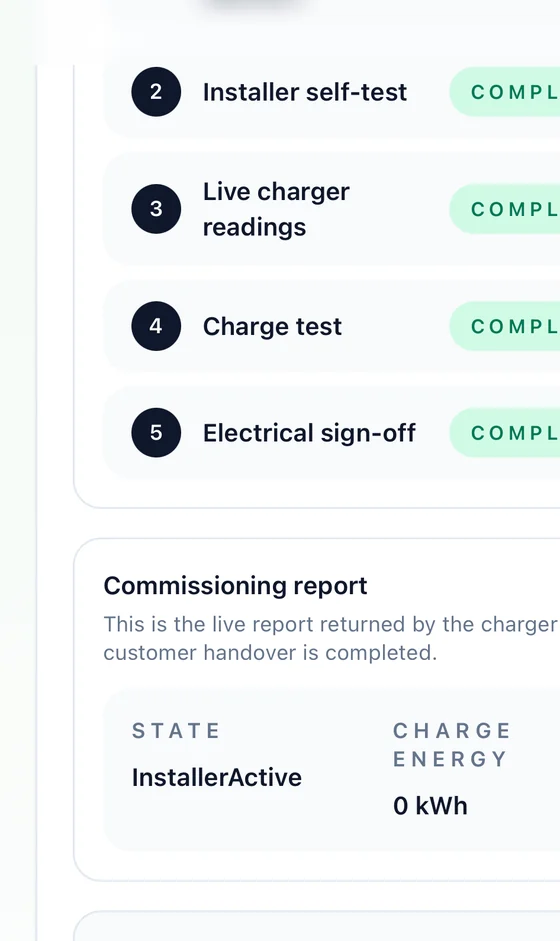
11. Review and Generate Customer Handover
The review step shows the completed handover checklist:
- device and network
- installer self-test
- live charger readings
- charge test
- electrical sign-off
Before completing the commission, decide whether to ask the customer to retain installer support access. The customer can approve or decline this when they claim the handover link.
Tap Complete commission and generate handover QR. The app generates a one-time customer handover QR code and link. Show the QR code on screen or share the handover link with the customer so they can sign in, claim the charger, and complete first-time setup.
The QR/link is customer-specific and time-limited. Share it only with the customer or the agreed handover contact.
Troubleshooting Quick Checks
- Bluetooth scan finds no charger: move closer, confirm the charger is powered on, check phone Bluetooth permissions, then scan again.
- Wi-Fi will not connect: confirm SSID, password, signal strength, DHCP, DNS, and firewall access.
- Cloud/OCPP is not connected: confirm the network route, then refresh live data before handover.
- Firmware update is running: wait for the charger to reboot and report healthy before final testing.
- Photo upload fails: retry with a smaller image or defer photos and upload later.
- Charge test cannot be completed: use manual override only with clear notes explaining why a vehicle or tester/emulator test was not possible.